How to Add Trim to a Kitchen Island
September 10, 2021
By: The Finished Space


When you’re thinking about making improvements to your home, there’s nothing quite as exciting or satisfying as a kitchen island renovation. If you’re like most people, you spend a lot of time gathered around this central space, either cooking, cleaning, prepping, or socializing. It’s where the kids do their homework when they get home from school or where you and your significant other split a bottle of wine at the end of a long day.
Let’s face it – the kitchen island is the star of the show, often outshining all the other appliances, no matter how big and shiny they are. So, the last thing you want is a boring kitchen island with absolutely no personality or character.
Well, we’ve got a fix for that. The best and most subtle way to add intrigue and drama to any installation is by adding a little trim or moulding to make it shine. It’s cost-effective and adds a bit of style and sophistication without taking up space. Best of all, it’s DIY-friendly.
What Types of Trim Can You Add to Kitchen Islands?

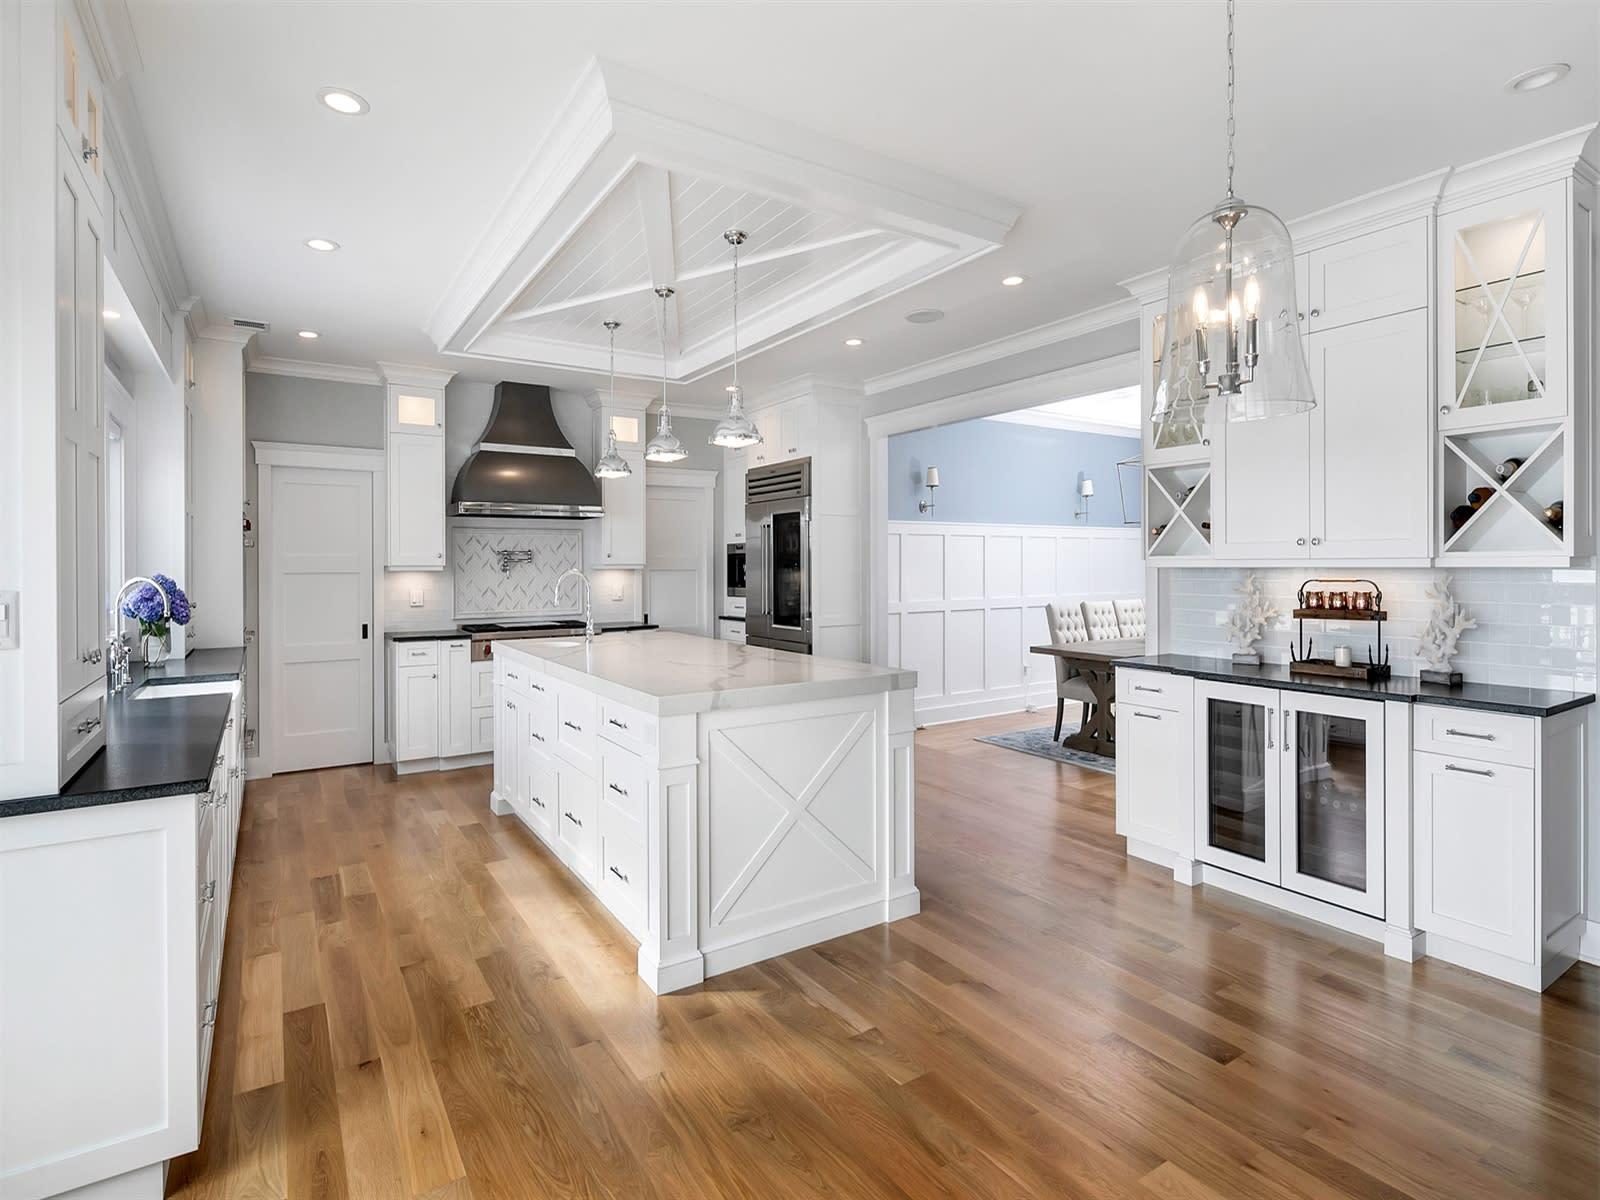
When it comes to adding trim, the kitchen island is a blank canvas. You can add almost any type of trim or moulding to elevate your design and make the natural centerpiece of your kitchen really stand out. That includes various types of trim, moulding, and baseboards.
In fact, you can even cover your kitchen island with an intricate shiplap design like the image above. Notice the craftsmanship and the expert installation. It’s rustic, clean, and practical, with visible outlets and super clean lines. If you’re ever wanting to expand your shabby chic aesthetic into the kitchen, that’s the way to do it!
6 Steps to Installing Trim to a Kitchen Island


Adding trim to a kitchen island is much simpler than you might think. Whether you’re talking about trim, moulding, baseboards, or shiplap, this step-by-step guide should give you an accurate idea of the installation process. It starts the same way every good home improvement project starts:
Step 1. Gather Your Tools, Paint, and Materials
Some crown moulding brands come pre-finished in the color of your choice, so you won’t have to worry about painting them. Depending on the type of trim you’re using, your supplies will vary. A standard list of tools and supplies that you’ll need:
Materials (Trim, Moulding, Baseboards, Shiplap, etc.)
A Pin Nailer
Nails
A Miter Saw
A Putty Knife or Scraper Card
Caulk
Touch-up Accessories
When it comes to touch-up supplies, you’ll want to gather those ahead of time. It will enable you to start and finish your kitchen island on the same day. If you come prepared, you shouldn’t run into any unnecessary delays.
Step 2. Smooth Out Surfaces
Before you attach the trim or moulding, make sure the surface of your kitchen island is completely smooth and bump-free. If you’re feeling brave, you might run your hand over the wood to check for uneven areas. But be careful – you don’t want to get a splinter.
Use a putty knife or scraper card to remove any uneven spots, including irregularities and excess drywall buildup. Once that’s complete, clean the excess sawdust from the area.
Step 3. Use a Pin Nailer to Attach the Trim
When installing trim, follow the guidelines provided for the materials you purchased. Next, use a pin nailer to attach the trim, paying meticulous attention to placement and spacing. This is also where a miter saw will come in handy, as you may need to cut some materials so they fit perfectly.
Step 4. Fill the Holes
Once the trim is attached, fill the holes left behind by the nails with your touch-up materials. Make sure to fill every hole with wax, scrape the wax with a scraper card for an even surface, and buff the area out. You can follow the same process on the edges and corners to create a smooth, even texture without visible breaks.
Step 5. Caulk the Edges
For the best and cleanest results, you should wait until the house is completely dust-free before caulking. When you’re ready, caulk the edges of the trim or moulding, where it meets the kitchen island. Allow adequate time to dry.
Step 6. Paint and Finish
Once that’s finished, your trim should be installed, which means you’re ready to add the final touches. At this point, you should paint and seal any area of the island that needs color correction. Once that dries, you’re good to go!
Finding the Best Trim for Your Kitchen Island
If you’re looking for the best trim to add to your kitchen island, you’ve come to the right place. At Metrie, we offer a wide variety of trim and moulding, perfect for any home improvement project.
And if you’re interested in discovering which kitchen island design style is right for your home, check out Option {M} today. It’s an interactive tool that helps you determine the ideal moulding and trim products for your design aesthetic.